Radio 버튼에 React Context 적용하기
1. Context 란?
나는 React 자체 전역 데이터 저장소라고 생각한다. 일반적으로 React에서 데이터를 하위 컴포넌트로 전달하기 위해서는 props로 일일히 내려줘야 한다. 따라서 데이터를 손자, 증손자, 고조손자까지 넘겨주려고 하면 코드가 지저분해질 뿐 아니라 불필요한 리렌더링이 발생한다. 이를 Props-Drilling이라고 한다.
Context를 이용하면 Provider로 감싼 모든 하위 컴포넌트에서 자유롭게 데이터에 접근 할 수 있다. 여기에 reducer를 이용해서 상태 업데이트를 규격화하면 일종의 Flux Pattern을 가진 미니 전역 저장소를 만들 수 있다. 중간 컴포넌트에서의 불필요한 리렌더링 또한 children prop으로 극복 가능하다. 이에 대해서는 아래에서 한 번 더 다룰 예정이다.
1.1. 간단한 예시 (ThemeProvider)
useContext를 사용하는 가장 대표적인 경우는 다크모드 관리이다. 아마 Context의 기본 동작이 Provider 하위 컴포넌트의 리렌더링을 유발하기 때문에, 다크모드처럼 제한적으로 바뀌는 값을 관리하는 것 같다.
import React, { useState, useContext, createContext } from 'react'
import { ThemeContext } from './context/ThemeContext'

export const ThemeContext = createContext()

function App() {
  const [isDark, setIsDark] = useState(false)

  return (
    <ThemeContext.Provider value={{ isDark, setIsDark }}>
      <Page />
    </ThemeContext.Provider>
  )
}

function Page() {
  return <div>Page</div>
}

function Component() {
  const { isDark, setIsDark } = useContext(ThemeContext)

  return (
    <div>
      <div>{isDark ? 'dark' : 'light'}</div>
      <button onClick={() => setIsDark((theme) => !theme)}>모드 전환</button>
    </div>
  )
}

export default App

1.2. useReducer 란?
reducer는 상태를 업데이트를 제한하는 함수로써, 전역 상태의 무분별한 접근과 수정을 방지한다.
useReducer를 사용하면 reducer로 관리되는 데이터를 쉽게 생성할 수 있다. useState와 아주 유사하여 공식문서에도 이 둘을 비교 정리했다. useState가 상태를 자유롭게 수정할 수 있는 setState를 반환하는 한편, useReducer는 미리 정의된 reducer에 맞춰 동작하는 dispatcher를 반환한다.
import React, { useState, useReducer } from 'react'

/**
 *
 * @param state 기존 상태
 * @param action dispatch로 전달 받은 인자
 * @returns
 */
const reducer = (state, action) => {
  switch (action.type) {
    case 'deposit':
      return state + action.payload
    case 'withdraw':
      return state - action.payload
    default:
      return state
  }
}

function App() {
  const [balance, dispatch] = useReducer(reducer, 0) // reducer, 초깃값

  function deposit() {
    dispatch({ type: 'deposit', payload: number })
  }

  function withdraw() {
    dispatch({ type: 'withdraw', payload: number })
  }

  return (
    <div>
      <p>{balance}원</p>
      <button onClick={deposit}>예금</button>
      <button onClick={withdraw}>출금</button>
    </div>
  )
}

1.2. Context와 useReducer
Context에 useReducer을 결합하면, Flux Pattern의 전역 저장소를 구현할 수 있다. 아래 예시 코드는 어쩌다보니 TypeScript로 작성했다.
// types.ts
import React, { createContext, useReducer } from 'react'

type TState = {
  name: string
  count: number
}

type TAction = {
  type: 'UP' | 'DOWN'
  pyload?: any
}

type TContext = {
  state: TState
  dispatch: React.Dispatch<TAction>
}
// Context.ts
import { createContext } from 'react'
import { TContext } from './types'

export const Context = createContext<TContext | null>(null)
// ContextProvider.tsx
import React, { useReducer } from 'react'
import { TAction, TState } from './types'
import { Context } from './Context'

const initState: TState = {
  name: 'sample-name',
  count: 0,
}

const reducer = (state: TState, action: TAction) => {
  switch (action.type) {
    case 'UP':
      return {
        ...state,
        count: state.count + 1,
      }
    case 'DOWN':
      return {
        ...state,
        count: state.count - 1,
      }
  }
}

const ContextProvider = ({ children }: React.PropsWithChildren) => {
  const [state, dispatch] = useReducer(reducer, initState)

  return (
    <Context.Provider value={{ state, dispatch }}>{children}</Context.Provider>
  )
}

export default ContextProvider
// App.tsx
import { useContext } from 'react'
import ContextProvider from './ContextProvider'
import { Context } from './Context'

const App = () => {
  return (
    <ContextProvider>
      <Parent />
    </ContextProvider>
  )
}

const Parent = () => {
  return <Child />
}

const Child = () => {
  const context = useContext(Context)

  if (!context) return

  return (
    <div>
      <div>{context.state.count}</div>
      <button onClick={() => context.dispatch({ type: 'UP' })}>+</button>
      <button onClick={() => context.dispatch({ type: 'DOWN' })}>-</button>
    </div>
  )
}

export default App

2. Context의 한계
흔히 Context의 한계로 중간 컴포넌트의 불필요한 리렌더링을 꼽는다. 맞으면서도 틀린 말이다.
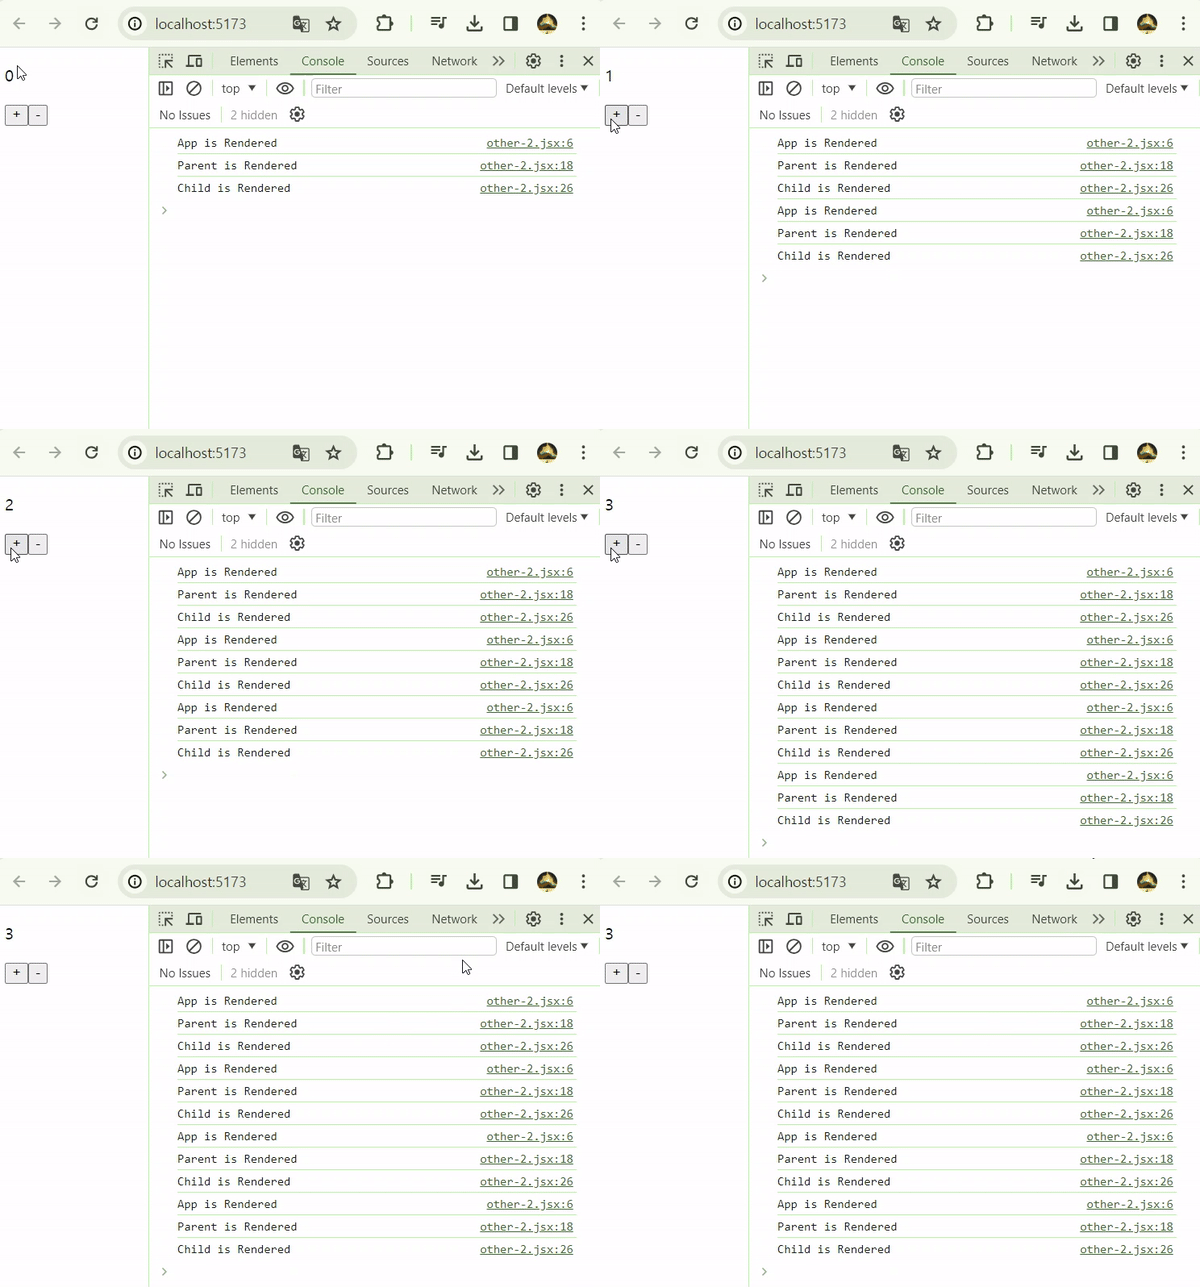
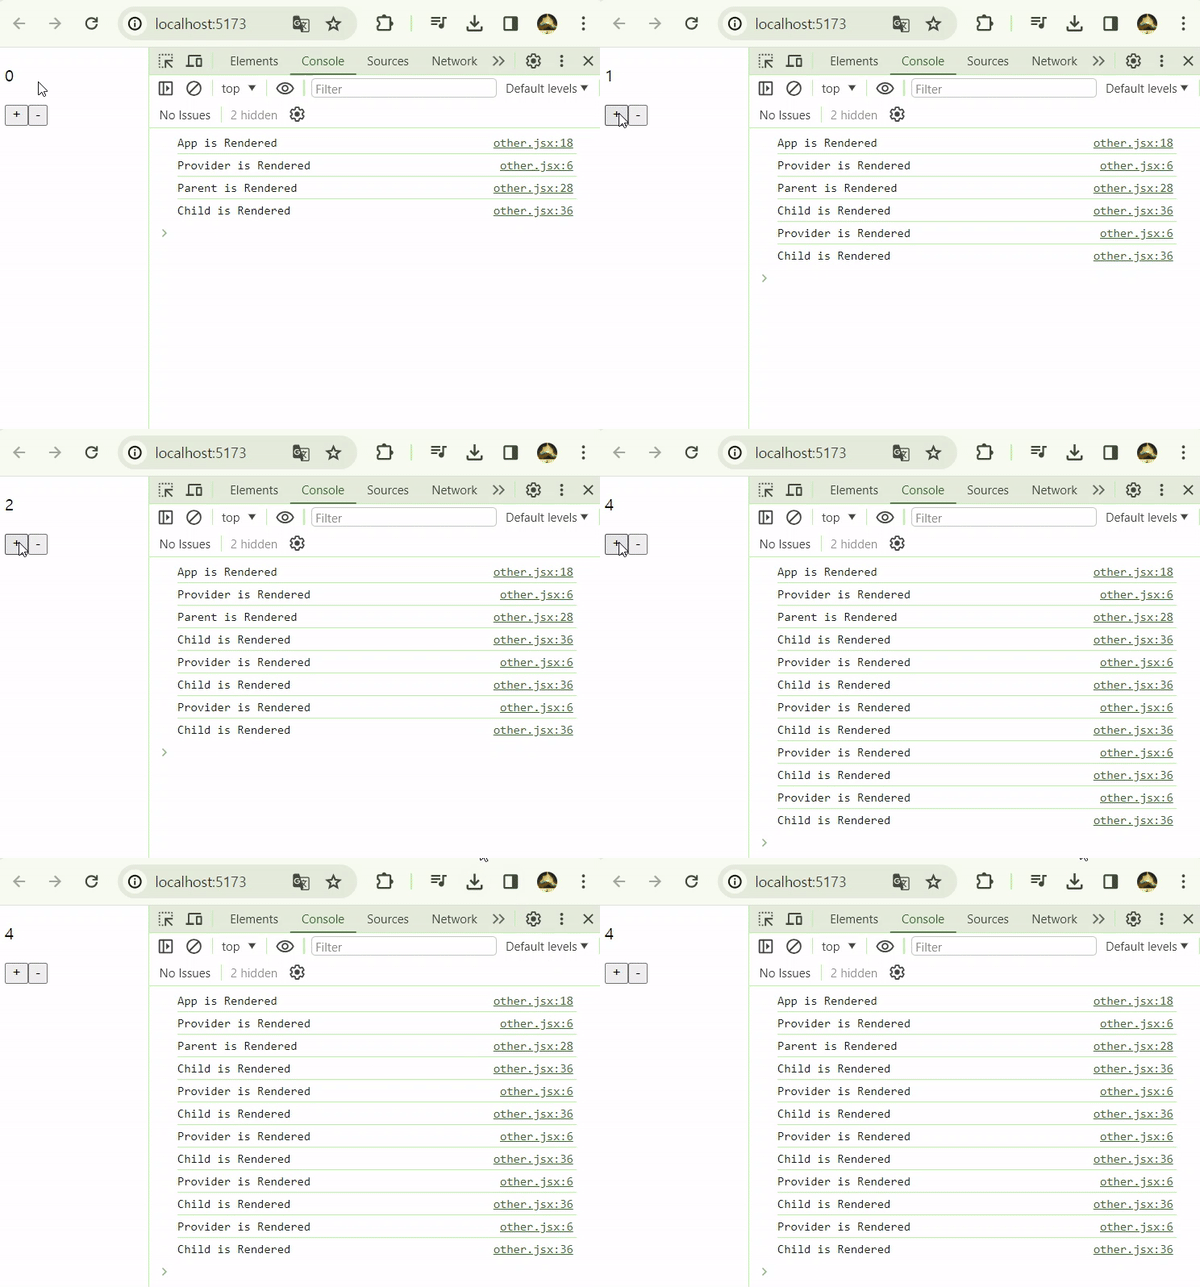
아래 두 개의 코드는 children Prop 사용유무를 제외하면 완벽하게 동일하다. 하지만 콘솔을 찍어보면, children을 사용한 경우에 중간 컴포넌트의 불필요한 리렌더링을 발생하지 않는다.
// children 사용 안함
import { useState, createContext, useContext } from 'react'

const MyContext = createContext(null)

const App = () => {
  console.log('App is Rendered')

  const [number, setNumber] = useState(0)

  return (
    <MyContext.Provider value={{ number, setNumber }}>
      <Parent />
    </MyContext.Provider>
  )
}

const Parent = () => {
  console.log('Parent is Rendered')

  return <Child />
}

const Child = () => {
  const { number, setNumber } = useContext(MyContext)

  console.log('Child is Rendered')

  return (
    <div>
      <p>{number}</p>
      <button onClick={() => setNumber((prev) => prev + 1)}>+</button>
      <button onClick={() => setNumber((prev) => prev - 1)}>-</button>
    </div>
  )
}

export default App

// children 사용함
import { useState, createContext, useContext } from 'react'

const MyContext = createContext(null)

const MyProvider = ({ children }) => {
  console.log('Provider is Rendered')

  const [number, setNumber] = useState(0)

  return (
    <MyContext.Provider value={{ number, setNumber }}>
      {children}
    </MyContext.Provider>
  )
}

const App = () => {
  console.log('App is Rendered')

  return (
    <MyProvider>
      <Parent />
    </MyProvider>
  )
}

const Parent = () => {
  console.log('Parent is Rendered')

  return <Child />
}

const Child = () => {
  const { number, setNumber } = useContext(MyContext)

  console.log('Child is Rendered')

  return (
    <div>
      <p>{number}</p>
      <button onClick={() => setNumber((prev) => prev + 1)}>+</button>
      <button onClick={() => setNumber((prev) => prev - 1)}>-</button>
    </div>
  )
}

export default App

2.1. children 에 대한 고찰
간단하게 말하면 children으로 ReactNode를 넘겨주는 행위는, 완성된 컴포넌트를 전달해주는 것과 같다. 하위 컴포넌트가 별개로 완성되어 상위 컴포넌트에 prop으로 넘겨졌기 때문에, 하위 컴포넌트의 렌더링이 더이상 상위 컴포넌트에 종속되지 않는다. (더 정확한 원인을 알기 위해서는 React 가상 DOM을 학습해야 할 것 같다.)
기존
const Parent = ({ children }) => {
  return <div>{children}</div>
}

// 아래 두 형식이 동일하다.
const Container = () => {
  return (
    <Parent>
      <Child />
    </Parent>
  )
}

const Container = () => {
  return <Parent children={<Child />} />
}
3. Radio에 Context 적용
드디어 오늘의 주제에 도착했다. Context는 분명 편리한 기능이지만, 다른 전역 상태 라이브러리에 가려져 잘 사용하지 않는다. 그나마 앞서 말한 ThemeProvider 정도랄까. 그러던 중 최근에 아주 좋은 사용처를 발견했다. 바로 Radio 인풋 버튼이다.
동일한 name의 Radio 버튼들은 서로 배타적이어야 하기 때문에 강한 연관성을 가진다. 하지만 이를 전역 상태로 관리하기에는 너무 지엽적이다. 이때 >Radio 버튼 그룹을 Context로 관리하면, 여러 개의 Radio 버튼 컴포넌트를 UI나 depth에 상관없이 자유롭게 배치할 수 있다. 구체적인 동작은 아래 코드에서 확인할 수 있다.
import { ChangeEventHandler, createContext } from 'react'

type TRadioContext = {
  name: string
  value: string
  onChange: ChangeEventHandler
}

export const RadioContext = createContext<TRadioContext | null>(null)
import { ChangeEventHandler, PropsWithChildren, useState } from 'react'
import { RadioContext } from './RadioContext'

type RadioGroupProps = {
  name: string
  defaultValue: string
  onChange?: ChangeEventHandler
}

const RadioGroup = ({
  children,
  name,
  defaultValue,
  onChange,
}: PropsWithChildren<RadioGroupProps>) => {
  const [value, setValue] = useState<string>(defaultValue)

  /**
   * 하위 Radio 버튼 change 이벤트 처리
   * 1. 데이터(vlaue) 업데이트
   * 2. 지정된 함수(onChange) 동작
   */
  const handleChange: ChangeEventHandler<HTMLInputElement> = (e) => {
    setValue(e.currentTarget.value)
    onChange && onChange(e)
  }

  return (
    <RadioContext.Provider value={{ name, value, onChange: handleChange }}>
      <div>{name}</div>
      <div>{children}</div>
    </RadioContext.Provider>
  )
}

export default RadioGroup
import { ChangeEventHandler, useContext } from 'react'
import { RadioContext } from './RadioContext'

type RadioProps = {
  value: string
  label?: string
}

const Radio = ({ value, label }: RadioProps) => {
  const radioContext = useContext(RadioContext)

  if (!radioContext) return

  return (
    <label>
      <input
        type="radio"
        name={radioContext.name} // context의 name으로 통일
        value={value}
        checked={!!radioContext && radioContext.value === value}
        onChange={radioContext.onChange}
      />
      {label ? label : value}
    </label>
  )
}

export default Radio
3.1. 사용 방법
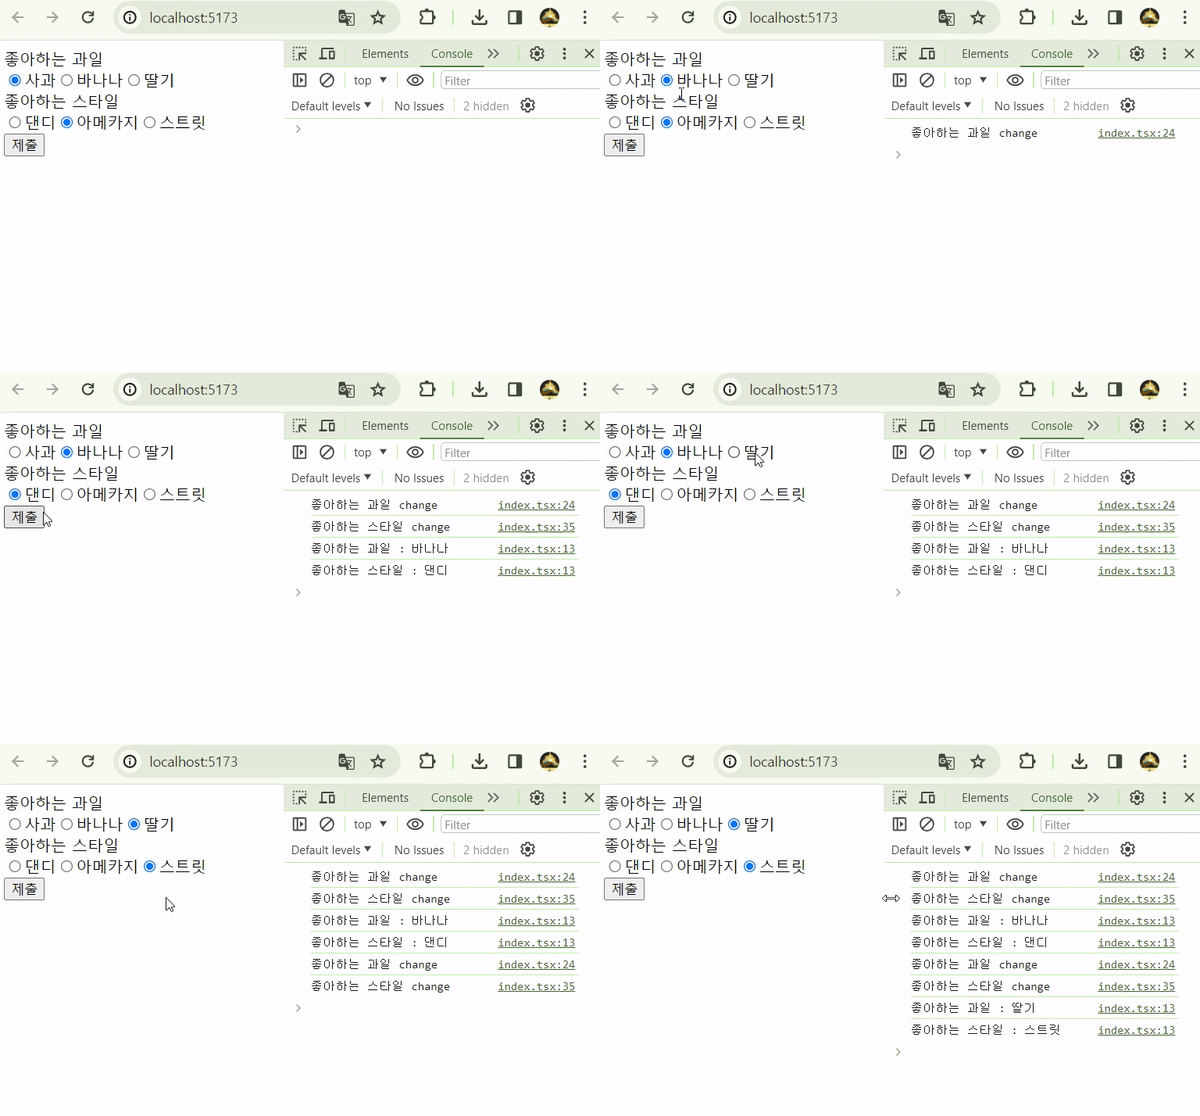
위 코드는 아래와 같이 사용할 수 있다. RadioGroup 안에 있는 Radio 버튼들은 depth에 관계없이 결합된다. 정말로 데이터가 잘 선택되었는지 확인하기 위해 submit이벤트 발생 시 form안의 데이터를 수집해서 콘솔로 출력했다.
import React from 'react'
import RadioGroup from './RadioGroup'
import Radio from './Radio'

const App = () => {
  const handleSubmit: React.FormEventHandler<HTMLFormElement> = (e) => {
    e.preventDefault()

    // formData 콘솔 출력
    const form = e.currentTarget
    const formData = new FormData(form)
    for (let key of formData.keys()) {
      console.log(key, ':', formData.get(key))
    }
  }

  return (
    <div>
      <form onSubmit={handleSubmit}>
        <RadioGroup
          name="좋아하는 과일"
          defaultValue="사과"
          onChange={() => {
            console.log('좋아하는 과일 change')
          }}
        >
          <Radio value="사과" />
          <Radio value="바나나" />
          <Radio value="딸기" />
        </RadioGroup>
        <RadioGroup
          name="좋아하는 스타일"
          defaultValue="아메카지"
          onChange={() => {
            console.log('좋아하는 스타일 change')
          }}
        >
          <StyleList />
        </RadioGroup>
        <button type="submit">제출</button>
      </form>
    </div>
  )
}

const StyleList = () => {
  return (
    <div>
      <Radio value="댄디" />
      <Radio value="아메카지" />
      <Radio value="스트릿" />
    </div>
  )
}

export default App
